Showing posts with label fresh basil. Show all posts

Wednesday, October 18, 2023

Cold Cucumber Soup


It's been a long time since I have added a recipe to my blog. I love this cold cucumber soup, it's so refreshing and versatile. The photo above shows these funny smaller yellow cucumbers which I have been buying at my farmers market. You can use regular green ones, of course. There is also a lot of latitude in the fresh herbs you can use. 


Ingredients

2 large European cucumbers, halved, seeded and coarsely chopped

1/2 red onion, chopped

1 garlic clove

1/3 cup loosely packed dill ( cilantro, arugula...)

2 tablespoons loosely packed tarragon leaves ( basil, mint, oregano...)

1/4 cup loosely packed flat-leaf parsley leaves ( cilantro, arugula...)

1/4 cup olive oil, plus more for drizzling 

1  1/2 cups plain Greek yogurt

3 tablespoons fresh lemon juice

Salt and pepper to taste 


Instructions

1) In a blender*, combine the chopped cucumber with the dill, tarragon, onion, parsley, ground white pepper, salt, olive oil, yogurt, lemon juice and garlic. Blend until smooth. * I like to start with the garlic.


2) Cover and refrigerate for 4 to 5 hours, or until chilled.
 

3) Taste and season the cucumber soup again as necessary just before serving. Pour the soup into bowls. Garnish with a drizzle of olive oil and serve.


Saturday, August 31, 2013

Kale Pesto and Nourished Point.


Kale, in case you hadn't noticed is all the rage and has been for several years. We are using it in salads, green soups, bean soups, I know people who make it into chips, so why not pesto ?? It's another great way to get those dark, leafy green into our meals.

My dear friend and acupuncturist, Tricia, grows great quantities of curly kale. She always sends me home with a large bag of it.

By the way, Tricia has started her own blog to share her knowledge of nutrition, health and childrearing, it's called Nourished Point. Her treatments are so helpful, I'm sure her blog will be too.


Kale Pesto

1/2 cup toasted pumpkin seeds
3 cloves garlic
1/4 cup parsley
4 cups kale: stemmed and chopped
4 cups basil
juice of 2 lemons
1 1/2 teaspoons salt

pinch of cayenne
1/2 cup olive oil

1) In a toaster oven or cast iron skillet, toast the pumpkin seeds.

2) Wash and stem the greens: parsley, basil and kale. Chop the kale to make it easier to put in the food processor.

3) Peel the garlic and whiz it first in the food processor.
4) Add the toasted pumpkin seeds, lemon juice, salt and cayenne: process.
5) Add the greens and the olive oil, process until smooth.

6) Serve on pasta, grilled vegetables, sandwiches...it freezes beautifully as well. And make a perfect meal for your vegan friends :-)


Tuesday, July 2, 2013

Basil, it's not just about pesto...


It is officially basil season with huge, leafy bunches showing up for cheap at local farmer's markets.
When most people think of basil, they think pesto, this garlicky pasta sauce is certainly a staple in our home.

Since basil is so abundant right now, let's think outside the sauce...

I used almost a whole bunch the other day when I made a variation of our favorite green soup, what a great addition. That big basil flavor went well with the other greens giving them a great summer taste.

Here are two more recipes that highlight this leafy herb: caprese salad and basil ice cream ( yes I did say basil ice cream, don't knock it until you try it !!).

Basil leaves are also great in sandwiches, on burgers, on pizzas, in fresh spring rolls and green or kale salads.

Capreses Salad
As the tomatoes show up at the farmer's market I get a craving for caprese salad.
"Caprese" means in the style of Capri, a very cool island off the coast of Italy. I remember swimming in a grotto there as a teenager, the water was an amazing color of turquoise, but I digress.

Caprese salad is simply fresh mozzarella slices, fresh tomato slices and basil, at least that is the basic recipe.

Here's how I made my caprese salad recently for a dinner with my brother.
Ingredients
4 large lettuce leaves
2 large balls, fresh mozzarella
1 clove finely chopped garlic
10 small tomatoes or 5 large ones
1-2 tablespoons good olive oil
1-2 tablespoons balsamic vinegar


1) I started with a bed of lettuce on a large plate.


2) Then I washed about 10 nice big basil leave and coarsely chopped them.
3) I sliced 10 small tomatoes from my brother's garden.
4) I finely chopped on clove of garlic
5) Sliced 2 big balls of fresh mozzarella.


6) I arranged all the ingredients on the bed of lettuce : mozzarella, tomatoes, garlic then basil.


7) I sprinkled the olive oil and balsamic vinegar over the top.


Here's my brother ready to dive into that caprese salad.

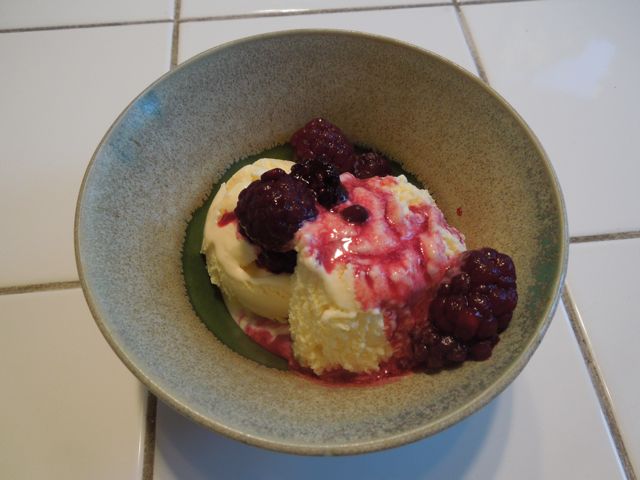
Basil Ice Cream with Balsamic Boysenberry Sauce

I was intrigued when a friend mentioned she had made basil ice cream. I asked for the recipe, changed it to suit my tastes and voila !!

Ingredients

For the ice cream*

2 cup milk
2 cups heavy cream
1/2 cup sugar
2- 4 egg yolks ( depending on how rich you want it)
1 tablespoon vanilla
15-20 basil leaves

* Feel free to use your favorite basic ice cream recipe and infuse it with the basil leaves.

For the topping

2 cups boysenberries ( raspberries, blackberries or strawberries will work too.)
2-3 tablespoons sugar
1 tablespoon balsamic vinegar.


1) Place the milk and cream in a pot on the stove at medium heat. Bring to just under a boil.

2) Add the basil leaves, stir, cover and allow to steep for 20 minutes. I would recommend tying the basil leave together with a bit of string, I found them difficult to fish out. Remove the basil leaves from the milk/cream mixture.


3) While the mixture is steeping, beat together in a bowl, the egg yolks, sugar and vanilla extract.


4) Heat the milk/cream mixture up slightly over low heat.

5) Add a tablespoon( up to four tablespoons) at a time to the egg mixture, beat in well each time.

6) Slowly pour the egg mixture into the milk/cream with the heat on low. Stir constantly.


7) Once all the yolk mixture is added cook for several minutes until it clings to the spoon and thickens. This usually take a few minutes.

8) Remove from stove, cool a bit before storing in the fridge until completely chilled.

Boysenberry Balsamic Topping

2 cups boysenberries ( raspberries, blackberries or strawberries will work too.)
2-3 tablespoons sugar
1 tablespoon balsamic vinegar.

1) Place all three ingredients into a bowl.


2) Toss gently and allow to sit for 20 minutes.


Make the ice cream, allow to firm up in the freezer, then scoop and serve with the topping.

You will be amazed at how good this is !!


Wednesday, March 6, 2013

Fresh Spring Rolls


If you have eaten Thai or Vietnamese food at a restaurant, you have probably seen fresh spring rolls on the menu. Unlike their deep fried cousin, they are packed with fresh raw vegetables. They are also a great vehicle for that fabulous peanut sauce I make.

With a little patience fresh spring rolls are easy to make and you can fill them with whatever you have on hand or what is in season. They will impress anyone at your next potluck or dinner party.

You will need to find the rice paper wrapper. These days most large or natural food grocery store have them in their Asian section or go to one of those amazing Asian food emporiums like Ranch 99.


We like our rolls stuffed with thin rice noodles or rice sticks sometimes called maifun. You can find these in the same Asian section of your grocery store.


Fresh Spring Rolls

Ingredients:

rice wrapper
thin rice noodles ( soy sauce, sesame oil)
ripe avocados
fresh cilantro
grated carrot
finely sliced cabbage
other possible fillings: baked tofu, cooked crab meat, fresh spinach leaves, fresh basil leaves, green onions, cucumbers, shrimp, bean sprouts, mint leaves, lettuce leaves.

1) Usually the rice noodle package comes with more that you will need even for a dozen spring rolls. Don't be shy about breaking off a third of the noodles, remember too, they will expand. Bring water to a boil, toss in your noodle and cook for 1-2 minutes.
2) Drain your noodle and toss with a tablespoon of sesame oil and 2 tablespoons of soy sauce. This is optional but I find the noodles pretty bland without something on them. Set them aside to cool while you prepare the vegetables.

3) Grate the carrot, finely chop the cabbage, stem the cilantro, peel and slice the avo.
4) Now you are ready to assemble them. I like to use a plate to soak the rice wrappers. They take about 30 to 60 second to rehydrate, make sure they are completely covered in water. Do them one at a time, as you take one out, put another one in.
5) I like to have a couple of clean dishtowels handy. One goes down under the rice wrapper and the other I use to blot it before I fill it. Handling the rice wrappers are a bit like handling wet paper towels. They rip easily if you are not careful. Small holes are OK, big ones are not ;-)

6) DO NOT OVER FILL your wrapper, that is the key to success. You are not going for the burrito grande !! Just layer your veggies with restraint, slightly to the top of the wrapper.
7) Fold the top of the wrapper toward you, then each side toward center, then wrap the bottom flap up. Place on a plate flap down.
8) Repeat until all your filling is gone. You will find you get the hang of it after the first few.
9) You can serve them whole or cut them in half on the diagonal. Use the peanut sauce I mentioned above or make your own version. These wrappers last for several days in your fridge !! They are great the next day for lunch !


Thursday, January 24, 2013

Crab Stuffed Manicotti


 Crab Stuffed Manicotti

 It's crab season !! Actually it has been crab season since November and I am finally getting around to posting about crab :-)

First off, if you are a vegetarian or vegan, you might want to skip this post. I may eventually come up with a vegetarian version of this recipe but for now there may be material coming that is unsuited for those who prefer their food without moving parts.

If you are lucky enough to live near the ocean, the absolute best way to get your crab is fresh off the boat. We are that lucky and receive emails whenever Frank has crabs to sell at the harbor.
They are truly amazing and we love supporting local fisherman. The only hard part for some folks is that you have to kill the crabs yourself. There are those who prefer to toss them into the boiling water whole...we have found that the meat is sweeter if you kill and clean them first, then steam them.
YouTube has lots of videos of how to go about it. I won't go into those details now.

Once you have cleaned them, steam them for 12 minutes.
Buy extra, eat all you can freshly steamed with crusty French bread and a salad !! Use the leftover crab for this recipe, that's what we did.

Or you can buy them cooked and cracked from most local markets. Be sure they are fresh NOT frozen.
I know taking the meat out of the shells is a hassle but well worth it when it comes to flavor. Get someone you like to help you or put on some good music ;-)

As a last resort you can buy it already removed from the shell, it is much more expensive. 
I have an aversion to canned crab, enough said.

Crab Stuffed Manicotti

Ingredients

  • 1 box manicotti pasta (about 12-14 shells)
  • 1 cup whole milk ricotta cheese
  • 1/2 cup grated Parmesan
  • 1 egg yolk
  • 1/2 cup chopped fresh basil leaves
  • 1 pound crabmeat
  • 1/4 teaspoon salt
  • 1/4 teaspoon freshly ground pepper
  • 1 teaspoon garlic granules
  • 1 jar Alfredo sauce
Here is how they keep the pasta from breaking in the package.


1) Preheat the oven to 350 F, if you are going to bake the manicotti right away. You can also make it up ahead and store for a day before cooking it.

2)Bring a large pot of salted water to a boil over high heat. Add the pasta and cook until tender but still firm to the bite, stirring occasionally, about 8 to 10 minutes. Drain pasta.

2) While the pasta is cooking, in a large bowl, mix together ricotta, 1/2 cup Parmesan, egg yolk, basil, crab, garlic granules, salt, and pepper.
3) Once the pasta is cooked drained and slightly cooled, fill the tubes with the crab mixture.  It's a bit of a delicate operation as you don't want to tear the tubes.
4)  Place in a buttered baking dish.
5) Cover with Alfredo sauce. I cheat and use the Trader Joe's version, as I find it works very well in this kind of recipe. The original recipe uses a plain white sauce and has you top the dish with more grated Parmesan cheese. Next time I would use bread crumbs as a topping, I just skipped the cheese this time.
You can see the fresh basil plant I also got from Trader Joe's to use in this recipe.
6) Bake uncovered until bubbly and the top is golden brown, about 20 to 25 minutes. Serve immediately with a big green salad !!

I forgot to take a photo when it came out of the oven. 
Here it is the second day, it makes great leftovers !!


This recipe is NOT low calorie or low fat. There are ways to make it so I am sure. 
I really don't mind rich food, I eat a small portion with a big salad and am very happy !