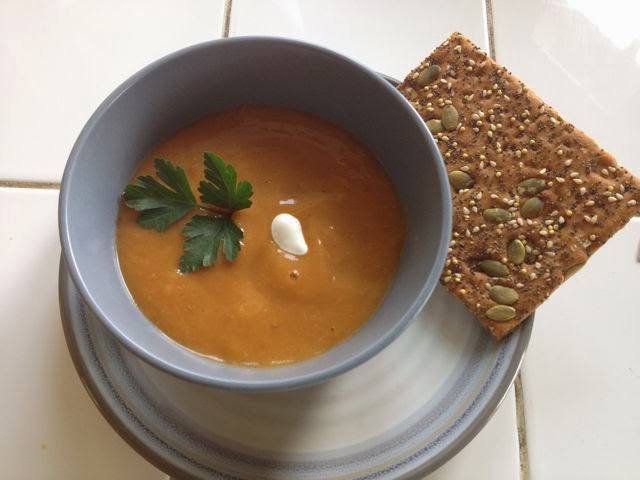
I guess March is a soupy month, I noticed my last post was a soup recipe. I do love soup, I make is weekly, pretty much all year around. It's an easy lunch or dinner, for one person or a larger group.
This latest soup was a happy accident. I wanted to make my usual carrot ginger soup as part of a dinner for a friend. I was going for the very simple version, where the carrots, onions and ginger all go into the pot at once with some water or broth to simmer. On impulse I added a cinnamon stick.
Once everything had cooked and cooled enough to pureé, I removed the cinnamon stick and some of the ginger. I tasted it and realized the cinnamon was quite strong but I didn't want to add a lot more liquid. As I pondered a way to fix this, I saw a can of coconut milk sitting on a shelf. I added the whole can which included some rather thick solid chunks. The texture was perfect and the taste was amazing !! The only thing it needed was a bit of acid ( apple cider vinegar ) and a touch of salt. I am so pleased with how this turned out, so was my dinner guest !!
Laurie's Carrot Coconut Soup
Ingredients
1 large onion, chopped into chunks
6-8 large carrots, chopped into 1 inch pieces
fresh sliced ginger ( about an inch long piece)
one inch of cinnamon stick ( this is less than I used originally)
soup stock or water to cover ( I add 1 tablespoon of Better Than Bouillon)
1 teaspoon apple cider vinegar
1 can coconut milk
salt & pepper to taste
1) In a large pot place carrots, onions, ginger slices, cinnamon stick, add enough water or stock to cover easily.
2) Bring to a boil and allow to simmer 30-45 minutes until the carrots are tender.
3) When it has cooled enough to puree safely, remove the cinnamon and ginger.
4) Puree in a blender in batches with some cooking liquid, the coconut milk and some of the ginger ( I like to peel it). How much liquid you use depends on the consistency you want, go easy at first. How much ginger you use depends on your tastes.
5) Add the vinegar, salt and pepper to taste and blend one last time.
6) Serve with a salad and some crusty bread.
Showing posts with label vegan dish. Show all posts
Thursday, March 22, 2018
Thursday, March 8, 2018
Red Lentil Cauliflower Soup
I have a wonderful trade worked out with a friend. She comes to help me do several hours of serious yard work, we have lunch and then I give her a massage. Recently I threw together some red lentil soup doing a riff on this recipe. My friend was so impressed she asked me for the recipe...of course I had made it on the fly and had to recreate it after the fact. It is an easy and very satisfying soup for lunch after some hard physical labor or perfect for dinner on a cold night.
Red lentil cauliflower soup
Ingredients
1 1/2 cup dried red lentils, rinsed
1 small cauliflower, 1 cup chopped
1 medium onion, chopped
1/2 cup chopped roasted red bell pepper
1 tsp cumin seeds
2 tsp curry powder
1 Tbsp olive oil
1 Tbsp Better Bouillon*
1 tsp. salt
3-4 cups water *( or stock in which case you could leave out the Better Bouillon)
1) Heat olive oil in a large pot, add onion and sauté until soft and brown at the edges.
2) Add cumin seeds and curry powder, cook for 1-2 minutes stirring well.
3) Add cauliflower and peppers, stir and cook for a few more minutes.
4) Add lentils, water, salt and bouillon, start with 3 cups water, adjust later for how thick you want it.
5) Bring to a boil, reduce heat and simmer for 30-45 minutes until the lentils are very tender.
Red lentil cauliflower soup
Ingredients
1 1/2 cup dried red lentils, rinsed
1 small cauliflower, 1 cup chopped
1 medium onion, chopped
1/2 cup chopped roasted red bell pepper
1 tsp cumin seeds
2 tsp curry powder
1 Tbsp olive oil
1 Tbsp Better Bouillon*
1 tsp. salt
3-4 cups water *( or stock in which case you could leave out the Better Bouillon)
1) Heat olive oil in a large pot, add onion and sauté until soft and brown at the edges.
2) Add cumin seeds and curry powder, cook for 1-2 minutes stirring well.
3) Add cauliflower and peppers, stir and cook for a few more minutes.
4) Add lentils, water, salt and bouillon, start with 3 cups water, adjust later for how thick you want it.
5) Bring to a boil, reduce heat and simmer for 30-45 minutes until the lentils are very tender.
![]() |
| It tastes a whole lot better than it looks in this photo... |
Tuesday, September 22, 2015
Quinoa Potato Cakes
I was served these simple potato pancakes at Mount Madonna, a retreat center where I attend a biannual yoga retreat. The food is always simple and usually tasty (sorry, I can be a bit of a snob). These pancakes were so delicious and satisfying, I could hardly believe they had only two main ingredients.
I just made a large batch and froze them just the other day, some we had for dinner, some will come with us on our big road trip this week and the rest will await our return as a simple addition to a future dinner.
2) Same with the quinoa, we often use it in place of rice with a stir fry, in fact I cook it in the rice cookers.
3) Mix equal part in a bowl, add salt, pepper, cumin etc... to taste.
4) Form into patties.
5) Place on a well oiled baking sheet or into a cast iron skillet. I use the spray olive oil, you can brush them with olive oil or melted butter.
6) Bake for 15 minutes then carefully flip them and brush or spray with more olive oil. Bake for another 15 minutes.
7) They should be nicely browned. If you use a skillet, they will take less time, cook on medium heat, flipping them after 5 minutes. Cook for another 5-10 minutes.
8) Serve with as a side dish with steamed greens, or a big salad, with a pork chop or sausages. They are great by themselves or try any of your favorite condiments, we like them with my tomato chutney.
They are great the next day heated up for breakfast or lunch !!
I just made a large batch and froze them just the other day, some we had for dinner, some will come with us on our big road trip this week and the rest will await our return as a simple addition to a future dinner.
You can get as fancy or a simple as you like with these cakes.
Quinoa Potato Cakes
Ingredients
2 cups cooked mashed potatoes
2 cups cooked quinoa
olive oil
salt & pepper to taste
optional: 1 teaspoon cumin powder or some sauteed leaks or ...whatever strikes your fancy.
1) Preheat the oven to 350 F. Make your favorite mashed potatoes and allow to cool enough to handle or use leftovers from the night before.
3) Mix equal part in a bowl, add salt, pepper, cumin etc... to taste.
4) Form into patties.
5) Place on a well oiled baking sheet or into a cast iron skillet. I use the spray olive oil, you can brush them with olive oil or melted butter.
6) Bake for 15 minutes then carefully flip them and brush or spray with more olive oil. Bake for another 15 minutes.
7) They should be nicely browned. If you use a skillet, they will take less time, cook on medium heat, flipping them after 5 minutes. Cook for another 5-10 minutes.
8) Serve with as a side dish with steamed greens, or a big salad, with a pork chop or sausages. They are great by themselves or try any of your favorite condiments, we like them with my tomato chutney.
They are great the next day heated up for breakfast or lunch !!
Sunday, July 12, 2015
Gazpacho time !!
The other day my sister gave me this beautiful basket of tomatoes from her yard in the banana belt of Sunnyvale. Maybe all of Sunnyvale is a banana belt...where I live two blocks for the edge of Monterey Bay is certainly NOT. I can't grow tomatoes here, except tiny cherry tomatoes that ripen in October. Please don't write to me about San Francisco Fog tomatoes, tomatoes are meant to be grown where it is warm and sunny, that's what makes them taste so good.
With this bounty at hand, my taste buds turned to the great summer treat: gazpacho. It's so easy and versatile, I knew I could put together a batch from what I had on hand.
I used my recipe from two summers ago. I didn't have a red onion so I used the sweet yellow onion I had on hand, I added celery since I had some, and used some roasted bell pepper from my freezer. Mostly it's just chopping and tossing it into bowl, the most tedious part is removing the skins from the fresh tomatoes. A couple of cups go into the blender, and added back to the bowl. Be sure to chill it before serving.
I enjoyed it before ushering for Much Ado About Nothing in the Glen and it made a refreshing appetizer before the meal I served to my nephew and his family last night.
With this bounty at hand, my taste buds turned to the great summer treat: gazpacho. It's so easy and versatile, I knew I could put together a batch from what I had on hand.
I used my recipe from two summers ago. I didn't have a red onion so I used the sweet yellow onion I had on hand, I added celery since I had some, and used some roasted bell pepper from my freezer. Mostly it's just chopping and tossing it into bowl, the most tedious part is removing the skins from the fresh tomatoes. A couple of cups go into the blender, and added back to the bowl. Be sure to chill it before serving.
I enjoyed it before ushering for Much Ado About Nothing in the Glen and it made a refreshing appetizer before the meal I served to my nephew and his family last night.
Friday, June 12, 2015
Coconut Curried Rice
Coconut curried rice has become a favorite around here...it makes our usual stir fry dinners much more exciting. Don't let the coconut in the title throw you off. My husband claims to dislike coconut in most dishes, when I first served this rice to him, I didn't mention the name or the ingredients. He loved it and was surprised it had any coconut at all. In fact it has coconut oil, coconut milk and unsweetened shredded coconut.
I first had a version of this recipe at a recent yoga retreat, Talya our Ayurvedic chef, served it for one of our dinners. I have made my own modifications, of course, mostly to make it quicker.
Curried Coconut Rice
Ingredients
2 cups white basmati/jasmine rice or 1 cup brown basmati rice
2 tablespoons coconut oil
1 teaspoon brown mustard seeds*
1 teaspoon whole cumin seeds *
1/2 teaspoon ground cinnamon
1/2 teaspoon ground coriander
1/2 teaspoon ground tumeric
3/4 cup coconut milk
1 1/2 cup water
1 teaspoon salt
3 tablespoons unsweetened shredded coconut
* I love having these whole spices in my cupboard, if you don't have them use ground cumin and skip the mustard. I'm sure it will still be tasty.
1) In a small saucepan or caste iron skillet, melt the coconut oil and add the spices, both whole and ground. Cook over medium heat for 2-3 minutes, stirring to keep from burning. Set aside.
2) I use a rice cooker which is soooo easy. If you cook much rice at all I recommend getting one, they are not that expensive.
If you don't have a rice cooker at this point you will place the water, coconut milk and salt into a pot and bring to a boil.
3) Rinse whatever kind of long grain rice you plan to use, remember 2 cups for white rice and 1 cup for brown rice.
4) Place the rice, coconut, cooked spices into your boiling water/coconut milk. Stir well, cover and simmer for 45 minutes for brown rice and 20-25 minutes for white rice. Remove from heat and allow to sit for 10 minutes before serving. Salt to taste.
OR
Place the rice, coconut, cooked spices, water and coconut milk into your rice cooker and turn it on. Once it is done, allow to sit for 10 minutes before serving. Salt to taste.
5) Gently mix it around a bit and serve.
I first had a version of this recipe at a recent yoga retreat, Talya our Ayurvedic chef, served it for one of our dinners. I have made my own modifications, of course, mostly to make it quicker.
Curried Coconut Rice
Ingredients
2 cups white basmati/jasmine rice or 1 cup brown basmati rice
2 tablespoons coconut oil
1 teaspoon brown mustard seeds*
1 teaspoon whole cumin seeds *
1/2 teaspoon ground cinnamon
1/2 teaspoon ground coriander
1/2 teaspoon ground tumeric
3/4 cup coconut milk
1 1/2 cup water
1 teaspoon salt
3 tablespoons unsweetened shredded coconut
* I love having these whole spices in my cupboard, if you don't have them use ground cumin and skip the mustard. I'm sure it will still be tasty.
1) In a small saucepan or caste iron skillet, melt the coconut oil and add the spices, both whole and ground. Cook over medium heat for 2-3 minutes, stirring to keep from burning. Set aside.
![]() |
| Here are all the spices before cooking. |
If you don't have a rice cooker at this point you will place the water, coconut milk and salt into a pot and bring to a boil.
3) Rinse whatever kind of long grain rice you plan to use, remember 2 cups for white rice and 1 cup for brown rice.
4) Place the rice, coconut, cooked spices into your boiling water/coconut milk. Stir well, cover and simmer for 45 minutes for brown rice and 20-25 minutes for white rice. Remove from heat and allow to sit for 10 minutes before serving. Salt to taste.
OR
Place the rice, coconut, cooked spices, water and coconut milk into your rice cooker and turn it on. Once it is done, allow to sit for 10 minutes before serving. Salt to taste.
5) Gently mix it around a bit and serve.
Friday, March 13, 2015
Vegan Feast
I just saw that it has been 10 days since my last post...life has happened. I found out last Thursday I had to find a new place for my almost 98 year old father to live, long story. The happy ending is that yesterday I moved him into a new abode with lovely blooming gardens.
Now I have time to post about this great vegan feast I made for my favorite vegans. Most of it you may recognize from past posts but reminders are good, right ??
I did try a new appetizer, roasted chickpeas. To give them some zing I added fresh lime juice which worked well but meant that the next day they were soggy. I will work on this recipe before I post it.
My fresh spring rolls are one of my dinner party stars. I stuffed them this time with grated carrots, avocado, baked tofu, fresh cilantro and kolhrabi.
The spring rolls are a great excuse to have lots of fun dipping sauces.
From left to right: soy citrus dipping sauce, pear ginger chutney, peanut sauce and homemade yogurt.
All of these sauce were a nice complement to the main course of stuffed flatbread, as well.
I made the spinach, pea and potato filling up the day before and used whole wheat tortillas instead of making my own. This helped to simplify the dinner prep.
To end the meal I made my new favorite orange cake, which happens to be vegan.
We were all very happy and sated after this feast !!
Now I have time to post about this great vegan feast I made for my favorite vegans. Most of it you may recognize from past posts but reminders are good, right ??
I did try a new appetizer, roasted chickpeas. To give them some zing I added fresh lime juice which worked well but meant that the next day they were soggy. I will work on this recipe before I post it.
My fresh spring rolls are one of my dinner party stars. I stuffed them this time with grated carrots, avocado, baked tofu, fresh cilantro and kolhrabi.
The spring rolls are a great excuse to have lots of fun dipping sauces.
From left to right: soy citrus dipping sauce, pear ginger chutney, peanut sauce and homemade yogurt.
All of these sauce were a nice complement to the main course of stuffed flatbread, as well.
I made the spinach, pea and potato filling up the day before and used whole wheat tortillas instead of making my own. This helped to simplify the dinner prep.
To end the meal I made my new favorite orange cake, which happens to be vegan.
We were all very happy and sated after this feast !!
Monday, January 12, 2015
Curried Chickpea Soup, Fresh Spring Rolls and Sushi Rice Balls.
After posting about my favorite holiday gift, those bags of Lompoc beans, I was inspired this weekend to make a large batch of chickpeas.
I will admit that the kind of cooking I do does require some forethought and planning.
I never thought about it much until my SIL asked about timing for meals. She was referring to the timing required to put all dishes of a meal out at the same time.
It got me to thinking, I realized that I very rarely decide what's for dinner a hour before I want/need to serve the meal. I think and plan several days ahead, that allows me to use dried beans and make my own sauces etc... I go to the farmer's market and grocery store once a week usually, so I need to have a vague plan for several meals when I shop.
Back to the beans, I rinsed and soaked them Friday night, cooked them in the slow cooker on Saturday. I froze some in bags and stowed 4 cups in the fridge for later.
Sunday, I made my favorite curried chickpea soup, delicious with a dollop of plain yogurt.
Later this week I will use the rest to make hummus.
I love making enough of whatever I make to have leftovers for lunch and subsequent dinners.
Several hours of food prep = two or three meals !!
To this end, I made sushi rice balls, using the sushi rice recipe from my roll your own sushi post.
I just add some black sesame seeds and a bit of sea salt.
For salad I went with fresh spring rolls. We had Thai food recently and that inspired me. I filled them with grated carrots, shredded cabbage, baked tofu, avocado and fresh cilantro.
If they seem like too much work you can toss all the same ingredients into a salad bowl or make my Asian slaw.
My easy peanut sauce is great with the spring rolls, sushi rice balls or as a salad dressing if you go that way.
We had all three items for dinner last night. Lunch today included the spring rolls and the rice balls. Tomorrow will be another chickpea soup dinner !!
I will admit that the kind of cooking I do does require some forethought and planning.
I never thought about it much until my SIL asked about timing for meals. She was referring to the timing required to put all dishes of a meal out at the same time.
It got me to thinking, I realized that I very rarely decide what's for dinner a hour before I want/need to serve the meal. I think and plan several days ahead, that allows me to use dried beans and make my own sauces etc... I go to the farmer's market and grocery store once a week usually, so I need to have a vague plan for several meals when I shop.
Back to the beans, I rinsed and soaked them Friday night, cooked them in the slow cooker on Saturday. I froze some in bags and stowed 4 cups in the fridge for later.
Sunday, I made my favorite curried chickpea soup, delicious with a dollop of plain yogurt.
Later this week I will use the rest to make hummus.
I love making enough of whatever I make to have leftovers for lunch and subsequent dinners.
Several hours of food prep = two or three meals !!
To this end, I made sushi rice balls, using the sushi rice recipe from my roll your own sushi post.
I just add some black sesame seeds and a bit of sea salt.
For salad I went with fresh spring rolls. We had Thai food recently and that inspired me. I filled them with grated carrots, shredded cabbage, baked tofu, avocado and fresh cilantro.
If they seem like too much work you can toss all the same ingredients into a salad bowl or make my Asian slaw.
My easy peanut sauce is great with the spring rolls, sushi rice balls or as a salad dressing if you go that way.
We had all three items for dinner last night. Lunch today included the spring rolls and the rice balls. Tomorrow will be another chickpea soup dinner !!
Tuesday, January 28, 2014
Roasted Broccoli and Brussel Sprouts
I am a fan of all cruciferous vegetables and I will eat them in many preparations. My favorites change as I find new and different ways to cook them. I started with steaming my broccoli, then would only eat it raw that changed to stir-fry, now I LOVE roasted broccoli.
In my opinion most people over cook their cole crops, which gives them a mushy texture and sulfurous odor and taste. Yuck, no wonder some president didn't like broccoli.
Recently I saw recipes for roasting broccoli pop up on Facebook. I liked the idea but was surprised by the temperature and cooking time, 375 for 30 minutes, sounds Midwestern to me. I did some more research online and in the oven. Hotter oven and shorter time works much better as far as I am concerned.
Usually I pan fry my Brussel sprouts, last night I added them to the broccoli, they were great.
I love that this way of cooking is so easy, I don't have to stand over the wok or sautee pan or use as much oil !!
Laurie's Roasted Broccoli
1) Preheat the oven to 4:00 F.
2) Line a heavy cookie sheet with foil.
3) Wash and chop your broccoli into medium size pieces. Halve or quarter the sprouts.
6) Roast them for 10 minutes. Yes, the edges of the broccoli get a little dark but I like that crunch. If you want them slightly more done, turn off the oven but leave them in for 5 more minutes.
7) Some folks like to add a squeeze a lemon or splash of balsamic vinegar. I really enjoy the sweet flavor just as is.
I served them with red quinoa, tofu noodles and peanut sauce.
In my opinion most people over cook their cole crops, which gives them a mushy texture and sulfurous odor and taste. Yuck, no wonder some president didn't like broccoli.
Recently I saw recipes for roasting broccoli pop up on Facebook. I liked the idea but was surprised by the temperature and cooking time, 375 for 30 minutes, sounds Midwestern to me. I did some more research online and in the oven. Hotter oven and shorter time works much better as far as I am concerned.
Usually I pan fry my Brussel sprouts, last night I added them to the broccoli, they were great.
I love that this way of cooking is so easy, I don't have to stand over the wok or sautee pan or use as much oil !!
Laurie's Roasted Broccoli
1) Preheat the oven to 4:00 F.
2) Line a heavy cookie sheet with foil.
3) Wash and chop your broccoli into medium size pieces. Halve or quarter the sprouts.
4) Place all veggies in a large bowl and toss with 1-2 tablespoons of olive oil. Add salt and pepper to taste.
5) Dump them onto the cookie sheet.
6) Roast them for 10 minutes. Yes, the edges of the broccoli get a little dark but I like that crunch. If you want them slightly more done, turn off the oven but leave them in for 5 more minutes.
7) Some folks like to add a squeeze a lemon or splash of balsamic vinegar. I really enjoy the sweet flavor just as is.
I served them with red quinoa, tofu noodles and peanut sauce.
Tuesday, January 21, 2014
Pressure cooker lesson and Hippocrates Soup
In my list of goals for this year I mentioned wanting to learn how to use the pressure cooker that sits in its box in my garage. My dear friend Laurie volunteered to show me how to use it, since she uses hers occasionally.
First we had a lovely lunch of her latest soup discovery: Hippocrates soup. Here is Laurie's post about it on her blog. In a minute I will give you my rendition.
Back to the pressure cooker...now remember I have some trepidation going into this. I associate pressure cookers with exploding beans and hot steam.
Laurie gets out the instructions, reads them through, explains stuff to me about seals, and release valves and I can feel my eyes ( and ears) glaze over. She wisely decides to test my pot by boiling water in it. As it boils I quiz her about how often she uses it and for which recipes. So far I have not heard anything that really sells me on it. Most of the stuff I can do either in my slow cooker or stove top with a dutch oven.
The cooker heats up and steam starts coming out, but the top doohickey doesn't wobble like it is supposed to and steam is coming out of some other hole in top. We turn it off but it is still a safety hazard, yikes. After reading through the instructions, it turns out I am missing a very small but, yes, essential part of the top. I breathe a big sigh, not of disappointment but of relief. Maybe I don't need to overcome this fear and instead I have one less piece of cooking equipment to store in my pantry !!
I did get a very tasty soup recipe out of our afternoon together. Laurie sent me home with with a sample. Bob liked it so much I decided to make it a couple of days later.
To find out more about why it is called Hippocrates soup, go to Laurie's blog.
I am sharing this recipe because it is a wonderful, flexible, rich pureed soup that reminds me of a French potage. It's a soup for the soul !!
My version of Hippocrates Soup
Ingredients
2 large yellow potatoes
2 leeks
2 carrots
1 large onion
1 fennel bulb
1 celery root ( or 2-3 stalks of celery)
1/2 cauliflower
1 cup purple cabbage
2 cups roasted tomato puree ( or whole tomatoes)
fresh herbs( small amounts of anything you have on hand, oregano, basil, thyme, sage, rosemary)
2 cloves garlic
salt and pepper to taste
1) The original recipe tells you not to peel most of the vegetables. I did peel the onion and the celery root. Otherwise just chop all the vegetables in large chunks except the garlic.
2) Place in a large pot on the stove and fill with just enough water to cover. You could also use stock if you prefer.
3) Add the tomato puree and fresh herbs.
4) Bring to a simmer and cook for two hours. You can also do this in a slow cooker overnight.
5) When it has cooled enough, puree in small batches in your blender. This is when I add the two cloves of garlic and the salt and pepper to taste.
6) Garnish with fresh parsley, yogurt or sour cream.
Next time: I try some parsnips, a bunch of fresh parsley or some chard.
First we had a lovely lunch of her latest soup discovery: Hippocrates soup. Here is Laurie's post about it on her blog. In a minute I will give you my rendition.
Back to the pressure cooker...now remember I have some trepidation going into this. I associate pressure cookers with exploding beans and hot steam.
Laurie gets out the instructions, reads them through, explains stuff to me about seals, and release valves and I can feel my eyes ( and ears) glaze over. She wisely decides to test my pot by boiling water in it. As it boils I quiz her about how often she uses it and for which recipes. So far I have not heard anything that really sells me on it. Most of the stuff I can do either in my slow cooker or stove top with a dutch oven.
The cooker heats up and steam starts coming out, but the top doohickey doesn't wobble like it is supposed to and steam is coming out of some other hole in top. We turn it off but it is still a safety hazard, yikes. After reading through the instructions, it turns out I am missing a very small but, yes, essential part of the top. I breathe a big sigh, not of disappointment but of relief. Maybe I don't need to overcome this fear and instead I have one less piece of cooking equipment to store in my pantry !!
I did get a very tasty soup recipe out of our afternoon together. Laurie sent me home with with a sample. Bob liked it so much I decided to make it a couple of days later.
To find out more about why it is called Hippocrates soup, go to Laurie's blog.
I am sharing this recipe because it is a wonderful, flexible, rich pureed soup that reminds me of a French potage. It's a soup for the soul !!
My version of Hippocrates Soup
Ingredients
2 large yellow potatoes
2 leeks
2 carrots
1 large onion
1 fennel bulb
1 celery root ( or 2-3 stalks of celery)
1/2 cauliflower
1 cup purple cabbage
2 cups roasted tomato puree ( or whole tomatoes)
fresh herbs( small amounts of anything you have on hand, oregano, basil, thyme, sage, rosemary)
2 cloves garlic
salt and pepper to taste
1) The original recipe tells you not to peel most of the vegetables. I did peel the onion and the celery root. Otherwise just chop all the vegetables in large chunks except the garlic.
2) Place in a large pot on the stove and fill with just enough water to cover. You could also use stock if you prefer.
3) Add the tomato puree and fresh herbs.
4) Bring to a simmer and cook for two hours. You can also do this in a slow cooker overnight.
5) When it has cooled enough, puree in small batches in your blender. This is when I add the two cloves of garlic and the salt and pepper to taste.
6) Garnish with fresh parsley, yogurt or sour cream.
Next time: I try some parsnips, a bunch of fresh parsley or some chard.
Tuesday, November 19, 2013
Kabocha Spice Soup
Kabocha squash are not really pumpkins although they look very similar. Kabocha are another variety of delicious winter squash. We had some last year, dumped the seeds in our compost and had volunteers this year in our front yard.
The other day I decided to bake the kabocha along with a butternut and delicata squash.
We ate the butternut straight up, it was so rich and creamy. I stuffed the delicata, I had forgotten how good stuffed squash is.
The kabocha was destined for soup. I didn't have a recipe, so I decided to riff off the carrot ginger soup we love so much. I was very happy with the results.
Kabocha Spice Soup
Ingredients
1 baked squash, peeled and cubes
1 onion chopped
1 tablespoon olive oil
1 inch fresh ginger, sliced
1 large bell pepper/ roasted bell pepper*
6-10 cups broth/water
2-4 teaspoons salt
1-2 teaspoons cumin
1/4 teaspoon cayenne
1/2 teaspoon coriander
1 tablespoon apple cider vinegar
1 inch fresh ginger, sliced
1 large bell pepper/ roasted bell pepper*
6-10 cups broth/water
2-4 teaspoons salt
1-2 teaspoons cumin
1/4 teaspoon cayenne
1/2 teaspoon coriander
1 tablespoon apple cider vinegar
* I used a roasted bell pepper I had frozen. You can use a fresh bell pepper, just be sure to add it to the onion to cook.
1) As I mentioned above, I baked the squash first, you can also steam it. In fact for this soup that might be the best bet. However you cook it, let it cool down, then peel it.
2) Cut into chunks and set aside.
4) I used a pepper I had roasted, so I added it when I added the sliced ginger and broth.
5) Once you add the sliced ginger and broth, simmer for 30 to 40 minutes, until the squash is very soft and mushy. The amount of broth you use will depend on the size of your squash and how thick you like your soup. You can always add more liquid when you puree it.
6) Allow the soup to cool enough to puree without chance of injury ;-) I like to add the rest of my spices then, as well as the vinegar, salt and more water or broth if needed.
The soup is rich and thick with a nice kick of heat from the cayenne. Perfect for a cold winter evening or lunchtime.
I served it with the tomato galette....
and a green salad with apples, radishes, carrots and cabbage.
Saturday, August 31, 2013
Kale Pesto and Nourished Point.
Kale, in case you hadn't noticed is all the rage and has been for several years. We are using it in salads, green soups, bean soups, I know people who make it into chips, so why not pesto ?? It's another great way to get those dark, leafy green into our meals.
My dear friend and acupuncturist, Tricia, grows great quantities of curly kale. She always sends me home with a large bag of it.
By the way, Tricia has started her own blog to share her knowledge of nutrition, health and childrearing, it's called Nourished Point. Her treatments are so helpful, I'm sure her blog will be too.
Kale Pesto
1/2 cup toasted pumpkin seeds
3 cloves garlic
1/4 cup parsley
4 cups kale: stemmed and chopped
4 cups basil
juice of 2 lemons
1 1/2 teaspoons salt
pinch of cayenne
1/2 cup olive oil
1) In a toaster oven or cast iron skillet, toast the pumpkin seeds.
2) Wash and stem the greens: parsley, basil and kale. Chop the kale to make it easier to put in the food processor.
3) Peel the garlic and whiz it first in the food processor.
4) Add the toasted pumpkin seeds, lemon juice, salt and cayenne: process.
5) Add the greens and the olive oil, process until smooth.
6) Serve on pasta, grilled vegetables, sandwiches...it freezes beautifully as well. And make a perfect meal for your vegan friends :-)
Thursday, August 15, 2013
Summer Soup : Gazpacho !!
It's hot today so I have gazpacho on my mind. In fact I just put some in the fridge to chill for tomorrow's dinner. I also promised my sister-in-law I would post this recipe soon. My brother is growing most of the ingredients in his garden. She got to taste it earlier this week. I made it to take on a one night camping trip we took to watch the Perseids meteor showers at Carrizo Plains.
![]() |
| Here's where we camped. |
I knew it would be a warm night so a cold soup was just the ticket. It was !! We did see about a dozen nice shooting stars that night. The next day we headed to Lompoc for two nights with my brother and sister-in-law.
Anyway back to the gazpacho, I did a take off on a recipe by Alton Brown. I have served it several times to guests always with rave reviews. It's great as a starter or for lunch. The combination of flavors and textures are very refreshing.
Great Gazpacho
Ingredients
5-7 tomatoes, peeled and chopped
2 cup tomato juice
1/2 red onion chopped
1 cup peeled, chopped cucumber
1/2 cup chopped red bell pepper
1 clove smashed garlic
1/4 cup olive oil
2 teaspoon balsamic vinegar
1/2 teaspoon cumin powder
1 lime or lemon, juiced
2 teaspoons salt
1/2 teaspoon pepper
pinch cayenne ( optional)
5 fresh basil leaves, 1 avocado ( optional)
1) To peel the tomatoes, pour boiling water over them for one minutes, drain and cover them in cool water for another minute or so. They should peel easily that way.
2) Chop the peeled tomatoes into small chunks and toss them into a bowl.
3) Peel and chop the red onion.
4) Peel and chop the cucumber and add it to the bowl.
5) Seed and chop the bell pepper, yes, in it goes.
6) Add the olive oil, lemon juice, balsamic vinegar, cumin, smashed garlic, salt and pepper ( and cayenne). Toss together gently.
7) Remove 1 1/2 cup of this mixture and blend it for 20 seconds in the blender. Mix it back in with the rest and refrigerate for several hours, or overnight, which I prefer.
8) When you serve it, you can top it with a finely chopped fresh basil leaf and several chunks of avocado.
Feel free to add other fresh herbs and spices. The proportions of the vegetables are not that important, use more tomatoes, less cucumber or different peppers if you wish. I do find that letting the flavors marry overnight gives the best results.
Subscribe to:
Posts (Atom)


,