I made more "lemon" cheese today. It is sooo easy. I used some in my lasagna instead of ricotta, I made some into the garlic herb spread I mentioned in the first cheese post. And I created a new cheese spread, it's very tasty. If you don't have time to make your own cheese you could try it with cream cheese or ricotta.
Laurie's Red Cheese Spread ( I'll come up with a better name eventually)
1 cup homemade cheese ( or 8 oz of cream cheese at room temp)
1 roasted red pepper (I roast them in the fall when they are plentiful at the farmer's market then freeze them on a cookie sheet, you can buy them in jars at the store, too. )
1/2 dried tomatoes ( rehydrate in boiling water, then drain)
1 tablespoon olive oil
1 tablespoon balsamic vinegar
1/2 teaspoon salt
1/2 teaspoon smoked paprika or chili powder
Into your food processor or blender put: the roasted red pepper, tomatoes, olive oil, vinegar, salt and paprika, blend until smooth. Add the cheese and blend until smooth again, scarping the sides once or twice.
Now it's ready to take to a party with fresh bread, crackers or tortilla chips.
Or use it on a fancy sandwich. It should last for 10 days in the fridge.
Friday, January 28, 2011
Divine Brownies
These are the best brownies I have found. Very simple to make. Pull the butter and the cream cheese out of the fridge the night before so they come to room temperature.

Divine Brownies
Grease a 13"x 9" pan and preheat oven to 325 degrees.
In a large bowl cream together:
1 cup butter (softened)
3 oz. cream cheese (softened)
2 cups sugar
Gradually beat in:
3 eggs
1 tsp. vanilla
In a separate bowl, sift together:
1 cup flour
3/4 cup unsweetened cocoa powder
1/4 tsp. baking powder
1/2 tsp. salt
Gradually add the dry ingredient to the butter mixture until well blended.
Stir in 3/4 cups chocolate chips. Spread batter into pan and sprinkle the top with 3/4 cup chopped walnuts or pecans.
Bake for 35 to 40 minutes( use the shorter time if you like them fudgy).

Apricot Mandarin Jam
I freeze a lot of fruit during the summer, most stone fruit (peaches, plums, apricots) and berries(strawberries, raspberries, blueberries, boysenberries) freeze beautifully. The trick is to freeze them on a cookie sheet with wax paper, lay them out in one layer. Dip them in lemon juice if they tend to turn brown. When they have completely frozen, remove them from the cookie sheet into a freezer bag. This way you can take out however much fruit you need for your recipe. Apples and kiwis freeze well too.
About this time of year I begin to look into my freezer to see what summer fruit I can make into jams for the winter. With my mandarins beginning to ripen I made up this tasty combination.


About this time of year I begin to look into my freezer to see what summer fruit I can make into jams for the winter. With my mandarins beginning to ripen I made up this tasty combination.


Tuesday, January 25, 2011
something else to do with your Champion juicer


I use a pound each of cashews, peanuts and almonds.
Trader Joe's carries a %50 less salt version of most roasted nuts, I use those for the peanuts and cashews, the almonds can be raw.
Be sure to mix the whole nuts together in a bowl first !!
With jam you have a very gourmet PB and J sandwich !!
Three pounds of nuts makes about three plus pint jars of nut butter.
Bob says to be sure to do a good job cleaning the axle for the blades.
Dry and even give it a bit of oil.
We have seen a half dozen of these machines at yard sales with the blades stuck on, this makes them useless.
Artisan No Knead Bread
I have been making no knead bread for over a year now.
This recipe requires a covered cast-iron, or enamel Le Creuset pot for baking. While it worked for me most of the time, I felt limited by having to use the pot, I couldn't make regular shaped loaves or rolls or baguette.


Recently Genna turned me on to another method. I like the flexibility of this one a lot.
Don't be daunted by the process, after the first time it will all make sense and you will find the best way to incorporate the steps into your daily routine.
I do recommend the instant yeast rather than just the dry active kind, better rise , better results.
The pizza stone and paddle make it very easy too.
3 cups lukewarm water
1-1/2 tablespoons dry instant yeast
1-1/2 tablespoons dry instant yeast
1-1/2 tablespoons kosher or other coarse salt
6-1/2 cups unsifted, unbleached all purpose white flour
6-1/2 cups unsifted, unbleached all purpose white flour
1. Warm the water slightly. (Warm water will rise the dough to the right point for storage in about 2 hours).
2. Add yeast and salt to the water in a large bowl.
3. Mix in the flour - kneading is unnecessary. Add all of the flour at once, mix with a wooden spoon - do not knead. You're finished when everything is uniformly moist, without dry patches. This step is done in a matter of minutes. The dough should be wet and loose.

4) Allow the mixture to rise at room temperature for about two hours. Longer rising times will not hurt your dough.

5) You can use a portion of the dough any time after this period. It is easier to handle once it has been in the fridge for a few hours. You can store it a plastic container for up to two weeks. The trick is to let it breath a little, either by making a small hole in the container top or by not sealing the container completely.
When you are ready to bake:
6) Shape your loaf. Place a piece of baking parchment paper (Parchment paper is a must for all baking, Costco has huge rolls for cheap.) on a pizza paddle, bread board or rimless baking sheet. Dust the surface and your hands with flour. This is just to prevent sticking - you don't want to incorporate the flour into the dough. Pull up and cut off however much dough you want to use. Put the rest back in the fridge for another time. Gently stretch the surface of the dough around to the bottom of the loaf you are forming. The top of the dough should be smooth - the object here is to create a "gluten cloak" or "surface tension".
Place the dough onto your parchment paper.
7) Let the loaf rise for about 30 - 60 minutes (it does not need to be covered). If it doesn't look like it has risen much, don't worry - it will in the oven.
8) Preheat a baking stone or pizza stone, (they are cheap at places like Target) on the middle rack in the oven for at least 20 minutes at 450 degrees F. Place an empty rimmed baking pan on a rack below the baking stone. This pan is for holding water for steam in the baking step.
9) Dust the loaf with a little flour and slash the top with a knife. This slashing is necessary to release some of the trapped gas, You need a very sharp knife, you don't want the blade to drag across the dough and pull it. Remember to score the loaves right before baking.

10) Bake. Set a cup of water next to your oven. Slide the bread (including the parchment paper) right onto the hot baking stone. Quickly pour the water right into the pan underneath the baking stone and close the oven door. This creates the necessary steam to make a nice crisp crust on the bread. Bake at 450 F for about 25 - 30 minutes.
11) Allow the bread to cool before cutting. I know it's tough but it is worth it.
I served this bread with the cheese from the previous post and it was all gone that evening.
You can make lovely whole wheat slicing bread with this process.
3 cups lukewarm water
1-1/2 tablespoons dry instant yeast
1-1/2 tablespoons dry instant yeast
1-1/2 tablespoons kosher or other coarse salt
2-3 tablespoons sugar.
3 cups unsifted, unbleached all purpose white flour
3 cups unsifted, unbleached all purpose white flour
3 cups whole wheat flour
1/2 cup oat or wheat bran.
Line your bread pans with parchment, do the "gluten cloak" as you are forming the loaves. Allow the dough to rise for an hour and bake for an hour. We love this bread toasted or as sandwiches.
Fresh bread is just heaven, we don't buy bread from the store anymore and lately even our bread machine has been languishing!
Sunday, January 23, 2011
Making your own cheese is easy !!!
I never knew it could be this easy...after reading about making cheese in Animal, Vegetable, Miracle by Barbara Kingsolver, I asked for a cheese making book for Christmas. My sister bought me: Home Cheese Making by Ricki Carroll. Both Bob and I read through it, while he was dreaming of cheddar, blue cheese and camembert, I just wanted a simple easy cheese to start with.
Lemon cheese from this book was the answer for me. The cheese will not taste like lemon, the lemon is just to make the milk curdle.
Here's what you need: 1/2 gallon of whole milk, 3 lemons, a thermometer, a pot, colander and a fine weave cheesecloth or piece of cotton muslin.
This recipe will yield about about 2 cups of cheese.
In a large pot, heat the milk to 185-200 F, stirring as it heats.
Add the juice of two lemons (about 1/4 cup) and stir well.
Cover the pot and let the milk set for 15 minutes. You are looking for curds or clumps to form. If they don't seem to form add more lemon juice.
Line the colander with fine cheesecloth and place over a deep bowl or pan, this will catch the whey.
 Pour the curds into the colander, twist the cheesecloth and hang the bag to drain. Don't squeeze because it squeezes out the fats and the cheese will be too dry.
 Allow to drain for 1 to 2 hours.
Remove the cheese from the cloth.
 Now the fun begins.
I find this basic cheese to be rather bland but very adaptable. At this point you can use it for lasagna, manicotti, cheesecake, frosting or whatever you can think up.
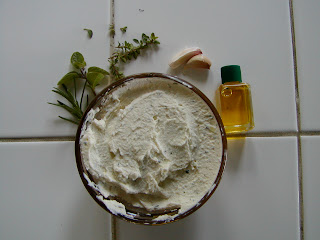
I decided to make this herb cheese spread to serve my dinner guests.
For one cup of cheese I added 2-3 tablespoon olive oil, a 1/2 teaspoon of salt, a small sprig of fresh rosemary, oregano and thyme and two cloves of garlic. I blended it all together in a small food processor. It makes it so creamy and great on crackers or bread.
Lemon cheese from this book was the answer for me. The cheese will not taste like lemon, the lemon is just to make the milk curdle.
Here's what you need: 1/2 gallon of whole milk, 3 lemons, a thermometer, a pot, colander and a fine weave cheesecloth or piece of cotton muslin.
This recipe will yield about about 2 cups of cheese.
In a large pot, heat the milk to 185-200 F, stirring as it heats.
Add the juice of two lemons (about 1/4 cup) and stir well.
Cover the pot and let the milk set for 15 minutes. You are looking for curds or clumps to form. If they don't seem to form add more lemon juice.
Line the colander with fine cheesecloth and place over a deep bowl or pan, this will catch the whey.


Remove the cheese from the cloth.

I find this basic cheese to be rather bland but very adaptable. At this point you can use it for lasagna, manicotti, cheesecake, frosting or whatever you can think up.
I decided to make this herb cheese spread to serve my dinner guests.
For one cup of cheese I added 2-3 tablespoon olive oil, a 1/2 teaspoon of salt, a small sprig of fresh rosemary, oregano and thyme and two cloves of garlic. I blended it all together in a small food processor. It makes it so creamy and great on crackers or bread.

Wednesday, January 19, 2011
Winter fruit tart

This seemed like the perfect start to my food blog.
My daughter posted this on her Facebook page:
Subscribe to:
Posts (Atom)