Wednesday, February 29, 2012

Baked Carrots

I used this photo of fresh carrots since the baked ones are not as attractive.
Bob loves baked or roasted carrots, he can wax poetic about them if you ask.
Baking brings out all their natural sweetness.
He likes to have them leftover in the fridge as snacks. Lately I have been indulging him ;-)

One vendor at our farmer's had the fancy carrots shown in the photo above. In fact those are the only ones I could find last week at the farmer's market so that's what I used, any fresh carrots will work.

1) Preheat the oven to 400 F.
2) Line a rimmed baking  sheet with foil and spray with olive oil.
3) Wash and stem the carrots.
4) Place them on the baking sheet and spray lightly with more olive oil, salt and pepper them.
5) Bake for 45-60 minutes depending on the size of the carrot. Part way through the baking time, I roll them over with tongs. They should be soft when pierced with a fork.
6) Serve warm or store in the fridge as snacks or use them in other dishes, like soups or curries.
They aren't terribly attractive once they are baked...but they sure taste good !!

Wednesday, February 22, 2012

Green Soup

My friend Laurie posted a recipe for her green soup on her Facebook page.
I put my own spin on it and came up with this very delicious and nutritious soup.
It made a great light dinner after going out to lunch with my dad.
I served the soup with millet muffins and a modified version of kale salad .
I look forward to having it for lunch today.

Ingredients
8 cups water
1 bunch of greens, beet green, chard...whatever you have on hand.
2 red potatoes or 1 cup mashed potatoes
1 small bunch broccoli
1 large onion
2-4 cloves garlic
1/4 cup miso
1 tbsp apple cider vinegar
1 tsp cumin powder
1 tsp salt
fresh ground pepper

1) Chop and saute one large onion and 2 to 4 cloves of garlic until soft and slightly brown.
2) Rinse,stem and chop whatever greens you are going to use.
I used two kinds of beet greens.
3) Chop your small bunch of broccoli, including the leaves.
4) Chop the potatoes. I used leftover massage potatoes because they needed using and that's all I had on hand.
5) Put all the veggies into the pot with the onions and garlic and 8 cups of water.
6) Simmer for about 30 minutes, be sure the potatoes are soft.

7) I let this all cool before I blended it, I recommend that, but if you must do it while still hot, be very careful. Put small batches into your blender or use an immersion wand.
I didn't take any photos while I was blending it...it's not that attractive ;-)

8) While blending the soup add 1/4 cup miso, 1 tablespoon apple cider vinegar, 1 teaspoon each salt and cumin powder and fresh ground pepper to taste.

9) Reheat to serve if necessary.
You can turn it into a cream soup by adding some yogurt or cream.

Saturday, February 18, 2012

Millet Muffins

My friend and cook extraordinaire, Mita first told me about these muffins months ago, maybe longer. She kept gushing about how wonderful they were. I am nodding my head and thinking, " uncooked millet in muffins, ewww...". Well she was right to gush. These simple muffins are so good, they are crunchy, and flavorful, not too sweet. They can make a great breakfast with fruit and yogurt.
So serve them with chili, they taste almost like a corn muffin, only better.
I was surprised at how much Bob loved them. The original recipe comes from Heidi Swanson's cookbook: Super Natural Everyday, as always I changed a few things but not many.

Millet Muffins
yield: a dozen


Ingredients
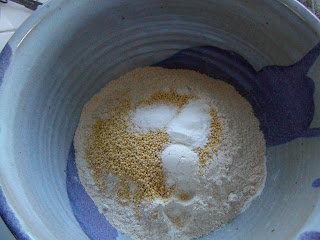
2 1/4 cups whole wheat pastry flour
1/3 cup raw millet, lightly toasted
1 teaspoon baking powder
1 teaspoon baking soda
1/2 teaspoon fine-grain sea salt
1 cup plain yogurt
2 large eggs, lightly beaten
1/2 cup canola oil (or barely melted unsalted butter)
1/2 cup honey
Grated zest and 2 tablespoons juice from 1 lemon

1) Preheat the oven to 400 degrees with a rack in the top third of the oven.

2) Butter a standard 12-cup muffin pan or line with paper liners.


3) Whisk together the flour, millet, baking powder, baking soda and salt in a large bowl.
4) In another bowl, whisk together the yogurt, eggs, oil, honey, and lemon zest and juice until smooth.

5) Add the wet ingredients to the dry ingredients and stir until the flour is just incorporated.
6) Divide the batter among the muffin cups, spooning a heaping 1/4 cup batter into each one, filling it to a bit below the rim. I found they can be quite full.

7) Bake for about 15 minutes, until the muffin tops are browned and just barely beginning to crack.

8) Let cool for 5 minutes in the pan, then turn the muffins out of the pan to cool completely on a wire rack.

Serve warm, Bob says you don't need butter.

Wednesday, February 15, 2012

Flourless Chocolate Cake...a little late :-)

I meant to post this recipe before Valentine's Day, but I didn't get around to it. You will just have to think of another excuse, soon, to make it for your sweetheart.

My friend, Susan sent it to me and then brought me a piece to try, yum !!
It is lighter than other flourless chocolate cakes I have made, which is nice.
The recipe she sent me from Epicurious makes a small cake, I found out on line that you can double this recipe just fine. As usual I made a few of my own modifications :-)

Flourless Chocolate Cake
- the small one*

Preheat oven to 375°F( the temperature is different for the larger cake) and butter an 8-inch round baking pan.
Line bottom with a round of parchment paper and butter paper.


Ingredients
4 ounces fine-quality bittersweet chocolate (not unsweetened)
1/2 cup butter

3/4 cup sugar

3 large eggs

1/2 cup unsweetened cocoa powder
1 teaspoon vanilla or almond extract or any liqueur of your choice
1/2 teaspoon salt.

1) 

Chop chocolate into small pieces.
2) In a double boiler or metal bowl set over a saucepan of barely simmering water, melt chocolate with butter, stirring, until smooth.
3) Remove top of double boiler or bowl from heat and whisk sugar into chocolate mixture.

4) Add eggs and whisk well.
5) Sift 1/2 cup cocoa powder over chocolate mixture and whisk until just combined.

6) Pour batter into pan.

7) Bake in middle of oven 25 minutes, or until top has formed a thin crust. 
8) Cool cake in pan on a rack 5 minutes and invert onto a serving plate, if you plan to serve it immediately. Be careful it is delicate and crumbles easily.
I made mine ahead of time, so after it cooled, I put it in the fridge in the pan.
When I removed it I decided to try a cute trick of making a doily print on top with powdered sugar.
Place the doily on the cake and evenly dust with powered sugar.

 It would have been perfect if I had been more carefully removing the sugar filled doily.
This cake begs for a topping, I decided on fresh whipped cream and strawberry sauce made with balsamic vinegar, blood orange juice and some sugar. It was delightful, tangy and the perfect foil for the chocolate.

*For the larger cake all ingredients listed are doubled. Use a 10 inch spring-form pan.
Bake at a lower 350 F for 35 to 40 minutes. Serves 10 to 12.

Sunday, February 12, 2012

Homemade Crackers !!


I had just been talking to Genna about making my own crackers, when our friend George happen to bring some to watch the Super Bowl with us last weekend. I was so impressed, they were thin, crisp with great flavor. It was hard to stop eating them. George kept affirming that they were easy to make and he was right. Only wish his team had succeeded as well as his crackers.

The original recipe comes from the Los Angeles Times, they called them "four-seed snapper crackers", which sounds kind of silly to me...  

George and I both made changes*.

Preheat the oven to 300 F
Ingredients:


Flaxseed meal, sesame seeds, pumpkin seeds, sunflower seeds.

Buckwheat flour, rye flour and whole wheat flour.

1/4 cup hulled sunflower seeds

1/4 cup hulled pumpkin seeds

1/4 cup flax seed meal or  whole flax seeds

1/2 cup un-hulled sesame seeds (they are tan, rather than pure white), plus extra for garnishing (white or black)

2 cups (9 ounces) whole-wheat or whole-rye flour, or a combination of the two

3/4 teaspoon salt

2 tablespoons honey or agave syrup

2 1/2 tablespoons canola oil

3/4 cup water

1 egg for an egg wash


1. In a mini food processor ( a blender or coffee grinder would do) , grind the sunflower and pumpkin seeds into a fine powder. Be careful not to blend too long or they will turn into seed butter. (The sesame seeds do not need to be ground.)
I love my mini food processor !!


2. In a mixing bowl or in the bowl of a stand mixer, combine the seeds, flour, salt, honey and canola oil with 3/4 cup water. Mix by hand or in a stand mixer with a paddle attachment to form a firm ball of dough. It should not be sticky.

It looks...unappealing doesn't it ??
3. On a lightly-floured surface, knead the dough by hand for about 30 seconds to make sure all the ingredients are evenly distributed and that the dough holds together. It should be slightly tacky but not sticky. Add more whole-wheat flour or water, if needed.

4. Line 3 to 4 baking pans with parchment or a silicone baking liner. Divide the dough into three equal pieces. Set two of the pieces aside and roll out the remaining piece on a floured surface with a floured rolling pin.

5) Roll it to less than one-eighth-inch thick, or nearly paper thin. Continually lift the dough as you roll it so that it doesn't stick to the surface; dust more flour under it if need be. You can also flip the dough over and continue rolling with the bottom side up. If the dough resists, lift it gently and set it aside and begin rolling out one of the other pieces. You can return to the first piece after a few minutes and it will roll more easily. Continue rolling out all three pieces in this manner.

6. Use a knife or pizza cutter to cut the rolled dough into rectangular or diamond-shaped crackers. (You can also use a small biscuit cutter, dipped in flour, to make round crackers.) The crackers do not need to be the same size. Carefully transfer the cut crackers to the baking pans. The pieces can be nearly touching, as the crackers will not spread or rise.
Fill each pan as full as it will allow.


7. Whisk the egg with some water. Brush the egg wash lightly over each of the crackers and top with sesame seeds.
8. If your oven has enough shelves to accommodate all the pans, you can bake them all at once. If not, bake them in shifts. After placing the pans in the oven, bake for 10 minutes.

8. Rotate the pans and bake for another 10 minutes. Make one final rotation and continue baking until they are done. (The thinner you roll them the faster they will bake -- they typically take about 25 to 30 minutes total, but this can vary from oven to oven.) The crackers will be a rich golden brown and should be fairly dry and crisp when they come out of the oven.

9. Leave them on the pans to cool; they will crisp up even more. If they do not snap cleanly after they cool, return the pan to the hot oven for a few more minutes.

The crackers can be stored in an airtight container or resealable plastic bag and kept for at least 8 days at room temperature or indefinitely in the freezer.

* What George did differently: he used all gluten free flours in equal parts: quinoa, brown rice and oat. I loved the flavor those other flours gave to the crackers, almost sweet and nutty. He forgot the flax seeds which I don't think made much difference. He topped them with some large flake sea salt and added more salt to the dough. The added salt did make a big difference. I forgot to do that to my batch and they could have used it. He also recommends a longer baking time 30 to 40 minutes.

* What I did differently: I used 1/2 cup buckwheat flour, 1/2 rye flour and 1 cup whole wheat flour because that is what I had around. The buckwheat is a strong flavor which we liked only wish I had added more salt to the dough and to the top of the crackers before I baked them. I would like to try poppy seeds and maybe almond meal or oat bran to the recipe sometime.

Bob says we should never buy crackers again !!

Very Easy Tomato Soup

After cleaning out my freezer last Sunday, I noticed I had lots of that wonderful roasted tomato sauce still available.

I wanted an easy dinner for one of my busy week nights...the light bulb in my brain went on...tomato soup !!

I defrosted 4 cups of the sauce, which already had onions and garlic in it. You could use your own canned tomato sauce as well.

I added 3 cups of stock (vegetable or beef) and heated it up. You could make it a cream  soup by using 2 cups of milk or cream

I tasted it and adjusted the seasoning a little, just a dash of salt and fresh ground pepper.
You could add fresh or dried herbs.

Voila, a very simple but tasty dinner.

I served it with homemade crackers, two kinds of cheese and a salad.
The cracker recipe is coming very soon !!

Friday, February 10, 2012

Brussel Sprouts...Petit Choux

That's what the French call them, petit choux means little cabbages, which is exactly what they are and much maligned by many.
I went to a Brussel Sprout festival at the Boardwalk years ago. The two things I remember most about this odd event: the sprout toss and the chocolate covered sprouts...neither very flattering.
My first and only bouquet from Bob was a stock of the wee cabbages, awww how sweet !!

Anyway...they have had a culinary renaissance in the past few years and if you don't steam or boil them to death, they can be quite tasty.

Be sure to get organic sprouts, they are a heavily sprayed crop.

I recommend cutting them in halves or quarters and sauteing them in butter or olive oil with lots of garlic and a splash of balsamic vinegar. Bacon is welcome addition if you swing that way.

The most important thing is not to overcook them, leave them a bit crunchy, al dente so to speak.

I think I'll get some from my farmer's market tomorrow.

Wednesday, February 8, 2012

Puff Pastry, I think I finally get it...

Puff pastry is one of those things that it is better to buy than try to make yourself unless you are crazy, an aspiring pastry chef or live somewhere so remote you can't buy it.
I was excited to find that Trader Joe's now carries their own version so I don't have to go to Safeway to get it.
My friend Susan is a whiz with puff pastry, she makes cute little chocolate filled rounds, triangles filled with lemon curd and pockets with winter squash and herbs. All of hers come out golden brown and puffy.
I have tried several different times to make dessert with puff pastry.
They looked good going in the oven...

...I was not very happy with how they came out. The pastry didn't puff and they were soggy. I know partly it was the filling, and they did taste fine.

Here are a few things I have learned about puff pastry:

1) It needs to defrost about 20 to 30 minutes, and the window of time is short. 

If you try to work with it too soon it is still frozen and will break. 
If you wait too long it gets too soft and gooey and will tear.
So have all your ingredients ready and don't be in a hurry.

2) Roll the dough out, this will give you a thinner crust, which will keep your end product from being doughy.

3) Use at egg wash, to both sides. Simple beat an egg and brush it on the pastry before filling. This will help to keep the pastry from getting soggy.

4) Bake in a hot oven, 400 F.
This will help with the browning.

I made goat cheese stuffed triangles the other day and they came out beautifully.
I mixed plain goat cheese with some fresh herbs, oregano, thyme and rosemary.

I rolled out my pastry square, cut it into four sections, did the egg wash thing, stuffed the squares and folded them over, made sure they were sealed.

I baked them for about 15 to 20 minutes.
The hard part was waiting for them to cool enough to eat !!

There are lots of different fillings and uses for puff pastry.
I had an amazing vegetable terrine the other night made by my friend, Laurie. 
And I have tried the little chocolate rolls Susan makes.
It's an easy but fancy appetizer to use little squares of puff pastry with a dab of pesto.
My next adventure will be to try some veggie pouches with the roots I just roasted: carrots, beets, parsnips, rutabagas and yams. I'll post if they come out well.

Monday, February 6, 2012

Gomasio- sesame salt


Last weekend during the Great Spice Cupboard Purge and Clean-out,  I found the tan unhulled sesame seeds I bought awhile back to make gomasio.

I remember first tasting it in college at UCSC. We had a very cool psych professor who would have students over for wine ( Alamden white in the jug) and snacks (cheese and apple slices with gomasio). For some reason this seemed very exotic ;-)

Here's what wiki had to say about sesame seeds.

To me gomasio a tasty topping for salads, veggies, eggs, rice, tofu, baked potatoes... anything you might put salt on or not :-) It is a fun dip for apples...

The ratio of salt to sesame seeds can vary from 1 to 6 to 1 to 16 depending on your tastes.

My current batch is about 1 tablespoon Kosher sea salt to 12 tablespoons of sesame seeds.
Put that mixture into a cast iron skillet and slowly roast the seeds over low heat.
Be sure to stir it to keep the sesame seeds from burning. When they begin to turn color and release that toasty smell, turn the heat off and allow to cool.

You can grind them in a mini food processor but I prefer the traditional use of a mortar and pestle.
Grind until most of the sesame seeds are crushed, I like to leave some whole.
Store in a shaker or a jar.