Showing posts with label fancy but easy dessert. Show all posts

Thursday, September 18, 2014

Very easy and amazing homemade ice cream.


At first I thought that I had to get this post on ice cream done before it was officially fall. Then I realized that as we move into the apple season, what could be more appropriate than a great, simple vanilla ice cream to go with an apple pie !!


As a kid in the summer, especially at our lake cabin in Eastern Washington, homemade ice cream was a treat and an expectation. It was always the very simple "Philadelphia" style, no eggs, no heating the milk. I seem to remember that my aunt's famous recipe was half and half, sugar and vanilla or lemon extract. While I loved this ice cream straight from the old hand cranked White Mountain freezer, it didn't save very well. It became icy when froze again.
 That is part of why I never used that recipe once I got my Cuisinart ice cream maker. Instead I would make a custard, which then had to chill. The ice cream was better once it had frozen some too. While it was very tasty, it was a process.
I can't remember why I decided to try the Philadelphia style recipe that came with my maker...but I am sure glad I did !! It is so rich, creamy, simple to make and freezes very well.
I'll be serving it this weekend with my baked apples.

Simple Vanilla Ice Cream
2 cups heavy whipping cream
1 cup whole milk
1/2 cup sugar
1 teaspoon vanilla extract

1) The milk and cream should be chilled, meaning straight from the fridge.

2) Mix all the ingredients together in a bowl, be sure the sugar has dissolved.

3) Place in your ice cream machine and set your timer for 25-30 minutes.


4) Eat right away or store in a container in the freezer until ready to serve.

It doesn't seem to last very long around here.

Thursday, October 10, 2013

Baked Apples


We are lucky enough to have several apple trees on our small urban lot, they do quite well in our coastal climate. Years ago we attended an apple tasting event at the local grange. There were over 100 varieties to sample, we both agreed that the Cox's Orange Pippin was our favorite. We now have two trees of this apple in our front yard, they are great to eat out of hand but also wonderful for pies, sauce and baked apples.

I was asked recently to make a dessert that included apples and caramel...baked apple came to mind. It's so easy and so very versatile.

This version is very simple, I used no sugar since I knew I would be topping it with ice cream and caramel sauce.

Baked Apples

Ingredients
a dozen baking apples
1/2 cup chopped walnuts
1/2 cup raisins
1 teaspoon cinnamon powder
1/2 cup brown sugar ( optional)

1) Preheat the oven to 350 F, butter or slightly oil a glass baking dish.
2) If you have a coring tool, it will go fasted but a paring knife or carrot peeler with a sharp tip will work as well. Core the apples.
 In the recipes I looked at they tried to get  me to not come out the other end, who are they kidding. Don't worry about that.
2) Place the apple in the baking dish.
3) In a small bowl toss together the nuts, raisins and cinnamon ( and brown sugar if you are using it.)
I used golden raisins, you can use dried cranberries, cherries or current if you prefer.

4) Stuff each apple with the nut/raisin mixture.
5) Cover with foil and back for 30 to 40 minutes depending on the size and density of your apples.
I checked mine after 30 minutes and they seemed firm still. So I let them go another 10 minutes and some of them exploded.
I am not sure why that happened to s few but not all. it didn't change the taste so I wasn't too concerned.
Now these apples are perfectly delicious as is. They can be eaten with plain yogurt or hot cereal as a great breakfast...or you can make then into a decadent fall dessert by adding vanilla ice cream and warm caramel sauce.
Here's my homemade vanilla ice cream.
 
I dare you not to eat it with a spoon.


Wednesday, July 10, 2013

Rustic summer fruit tart, so easy !!


Recently my brother was here for a quick visit, he loves desserts. I had some very ripe Santa Rosa plums and lots of puff pastry in my freezer. Time for this very simple fresh fruit tart.

The hardest part of this recipe is finding frozen puff pastry in the summer. For some reason Trader Joe's thinks that puff pastry is a seasonal item. Well, I fooled them and stocked up in December. I am guessing that other stores may have different ideas about seasonality. Plus my brother claims puff pastry is not that hard to make, but for now find the frozen stuff.

I prefer to defrost puff pastry in the fridge overnight. You can also do it straight from the freezer to your kitchen counter. The box should give you tell you how long it will take.
You will want to have everything ready to work with before you unwrap the puff pastry. If it gets too warm it is hard to work with. Just chill it for a few minutes in the fridge.

Rustic Fruit Tart

Ingredients

1 sheet defrosted puff pastry
12-14 plums ( peaches, nectarines and other stone fruit work well too)
2-4 tablespoons sugar
1/2 teaspoon cinnamon
1 egg (for the egg wash)

1) Preheat oven to 400 F. Get a large baking sheet and a piece of parchment to fit it.
2) Prepare the plums, cutting slices on either side of the pit. (I describe this technique in my post about yellow plums.)
3) Make the egg wash by beating one whole egg.
4) Remove the puff pastry from the package and place it on the parchment.
5) Roll out the pastry, fold the edges.
 6)  Brush with the egg wash.


7) Sprinkle with 1-2 tablespoons sugar and 1/2 teaspoon cinnamon.

8) Place the plums on the pastry, cut side up. Use a fork to press the edges down.
9) Sprinkle on the remaining sugar.

10) Bake at 400 F for 25 to 30 minutes.

This is best served warm and fresh from the oven. The pastry will get soft if you save it and reheat it.
This make a great breakfast served with yogurt or a not too sweet dessert served with whipped cream or  ice cream.

Thursday, May 9, 2013

Very Very Chocolate Cookies


"When it comes to chocolate, more is always better."
That's the tag line for these super rich chocolate cookies with walnuts.
They are almost like a round brownie and will make any chocolate lover smile.

Remember to plan ahead as this dough needs to be chilled before baking !!


Ingredients:

5 oz. unsweetened chocolate*, chopped
8 oz. bittersweet or semi sweet chocolate, coarsely chopped
1/2 cup butter
4 large eggs
1 1/2 cup sugar
1/4 teaspoon vanilla extract
1/2 cup plus 2 tablespoons unbleached flour
1/2 teaspoon baking powder
1/4 teaspoon salt
3/4 cup walnuts, chopped and toasted

1) In a small pan over low heat, melt the unsweetened chocolate and 4 oz. of the bittersweet chocolate. Set aside to cool.
2) Using a standing mixer or large bowl with a hand mixer, whip the eggs and sugar on medium speed for 10 minutes until thick and light in color.
3) With the mixer on low speed, add the melted chocolate mixture and the vanilla until blended.
4) With a rubber spatula, fold in the flour, baking powder and salt, scraping the bowl.
5) Fold in the remaining 4 oz. of chocolate and the walnuts.

6) Refrigerate the dough until it is firm enough to scoop, at least 1 1/2 hours.

7) Preheat oven to 350 F. The original recipe says to use an ungreased cookie sheet, I lined mine with parchment.

8) Drop scoops or large rounded tablespoons of dough onto the cookie sheet about 3 inches apart.

9) Bake until the cookies are cracked on top, dry on the surface but soft inside, about 15 minutes.


10) Allow to cool for a minute before removing to a cooling rack.


11) Store in a closed container and see how long you can keep them around ;-) They do freeze well if you have that much restraint.

* The second time I made these cookies I did not have unsweetened chocolate, so I used the darkest chocolate I did have. They still came out VERY chocolaty !!

Tuesday, February 19, 2013

Creme caramel, no it is not creme brulee...

The other day I decided to make French onion soup and the obvious dessert for me was creme caramel.

Creme caramel is the French version of  custard or flan with caramelized sugar on the bottom ( unlike creme brulee which has a light crust of caramelized sugar on the top and a very different rich custard beneath).
It is a standard dessert in every restaurant in Paris. I spent eight years of my childhood in Paris. My mother loved this simple dessert and would try it whenever we ate out ( or that's the way it seemed to me.)

This recipe is straight from Mastering the Art of French Cooking by Julia Child. Yes, her recipes have lots of steps and can be intimidating, just like life, take it one step at a time.

Lining the dish with caramel.

Ingredients
1/2 cup white sugar
2 tablespoons water

1) I use one large ceramic baking dish that holds at least 6 cups, you can also do small ramekins.
The recipe calls for the dish to be warm. I fill the pan it sits in with hot water while I make the caramel.


2) Place the sugar and water in a small heavy bottom saucepan and stir to dissolve the sugar.
3) Cook over moderate heat and allow to come to a boil. Watch it carefully !!

4) It will turn caramel colored fairly quickly.
5) When the sugar has turned color, remove the pan from the stove and pour into the dish which has been removed form the hot water, swirl it around so that it covers the bottom of the dish.

(Sidebar, cool thing...have you ever had a dessert with spun sugar ?? My sister used to make this fanciful yule log dessert complete with meringue mushrooms and spun sugar spider webs. It was impressive... you can use the caramelized sugar to make those spider webs.)

Making the custard. 
Preheat the oven to 350 F.

Ingredients
2 1/2 cup milk
1 vanilla bean or 1 teaspoon vanilla extract
1/2 cup white sugar
3 eggs
3 egg yolks

1) Bring the milk with the vanilla bean if you are using one to just below a simmer in a saucepan.
2) Cover and allow to steep while you prepare the rest of the mixture.

3) For the next part you can use a Kitchenaid with a whisk attachment or do it by hand with a whisk.
4) Place the eggs and egg yolks in a mixing bowl, slowly mix in the sugar until light and foamy.

5) Continue beating while you very slowly add the hot milk ( minus the vanilla bean). This can be tedious and messy, just hang in there. Add the vanilla extract if you did not use a bean.

6) Strain the mixture into your dish with a sieve, this removes any weird little eggs bits or forgotten vanilla beans ;-)

7) Boil enough water to fill a baking pan that will hold your dish.

8) Place the pan and the dish of custard on the lower rack of your oven, then carefully pour in the boiling water.
9) Reduce the oven temperature to 325 and bake for 40 to 45 minutes.

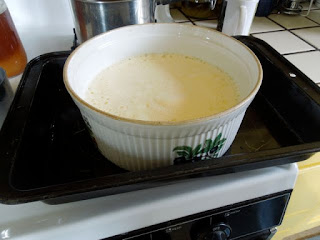
10) I prefer to to serve my creme caramel chilled or at room temperature.  Either way it should rest for several hours or overnight in the fridge. Since I make it in a large dish, I don't bother to unmold the whole thing. Instead I scoop out the portions, serving them in small ramekins with the caramel sauce drizzled over. You can remover any caramel that sticks to the bottom with a tablespoon or two of boiling water.
The only problem with this dessert is that it disappears too quickly !!

Tuesday, July 17, 2012

Molten Chocolate Cakes or Lava Cakes

Several weeks ago some friends came to stay with us for the weekend. Rex is a true chocoholic so I knew this would be the perfect time to try this dessert. Bob and I shared one our last night in Melbourne and I have been wanting an excuse ever since. I know molten chocolate cakes have been around for a while, I found this recipe on the New York Times website...they do make an impressive dessert to serve for guests.

Molten Chocolate Cakes

Ingredients
  • 1/2 cup  butter, plus more to butter the molds
  • 4 ounces bittersweet chocolate, preferably Valrhona or some other high quality dark chocolate
  • 2 eggs
  • 2 egg yolks
  • 1/4 cup sugar
  • 2 teaspoons flour, plus more for dusting
They carry Valrhona at Trader Joe's !!

1) If you are going to bake them right away, preheat the oven to 450 F. They can prepared in advanced but should be baked right before serving.
2) Prepare four ramekins or custard cups, buttering them and then dusting them with flour.
3) In the top of a double boiler set over simmering water, heat the butter and chocolate together until the chocolate is almost completely melted.

4) While that's heating, beat together the eggs, yolks, and sugar with a whisk or electric beater until light and thick.
Here's Rex beating the eggs and sugar. That is one happy guy !!

 5) Beat together the melted chocolate and butter; it should be quite warm.
 6) Pour the egg mixture into the melted chocolate and butter.
 7) Then quickly beat in the flour, just until combined.
8) Divide the batter among the molds. (At this point you can refrigerate the desserts until you are ready to eat, for up to several hours; bring them back to room temperature before baking.) Place the ramekins on a baking sheet.


9) Bake the molds for 5 to 6 minutes; the center will still be quite soft, but the sides will be set. And trust me they only need to bake for that long !!

10)  Invert each mold onto a plate and let sit for about 10 seconds. Unmold by lifting up one corner of the mold; the cake will fall out onto the plate. Serve immediately.
11) We served ours with a decadent array of ice cream choices, whipped cream would be good as well.
Rex picked out four flavors: chocolate, vanilla, salted caramel gelato and coconut bliss.
I found that I would have preferred splitting one of these very rich little gems.
A whole one was too much for me, I ate it anyway ;-)
And we were surprised to find that they are great the next day cold, they turn into a fudgy brownie-like cake !!