Thursday, May 26, 2011

Roll Your Own Sushi !!

My brother and his family were the first to invite me to a "roll your own sushi" dinner.
The title is a bit deceptive, there isn't a lot of rolling involved but it is a fun and very tasty way to get your sushi fix for a fraction of the cost of a  restaurant. I  love it because everyone gets to make their own "rolls".

 You don't need any special equipment, and these days most large supermarkets and natural food stores carry the few specialty food items you will need.

Our local fish market carries "sushi grade" fish like ahi tuna. If you are lucky enough to live near an Asian market like Ranch 99 or Mitsuwa you can really get fancy !!

Here's what you will need:

Sushi rice, most short grain white rices will work
Rice wine vinegar
Nori, the sheets of seaweed for wrapping
Soy Sauce
Wasabi, green horseradish paste
pickled ginger

Fillings, here you can let your imagination go wild.
avocado
cucumber
cooked shrimp
fake crab
fresh crab
smoked salmon
lox
sushi grade Ahi tuna or any other fish that has the designation
chopped macadamia nuts
cream cheese
Inari, canned tofu pockets ( my Safeway even carries them)
etc...

To make the sushi rice I use a rice cooker and 1/14 cup water per washed cup of rice.
Once the rice is cooked but still warm, scoop it into a bowl. For each cup of rice dissolve 1 teaspoon of sugar and salt into 1 tablespoon of rice wine vinegar, then add to the warm rice, mixing to coat all the grains. Set this aside while you prepare the fillings.
cucumber spears and avocado slices
Smoked salmon and seared ahi, both from the fishmonger at our farmer's market.

 I set the table with small bowls for soy sauce and the wasabi, and finger bowls as the rice is easier to handle with wet finger, all the fillings, rice and seaweed.

To make your roll simple take some rice and flatten it onto your piece of nori, add your fillings, roll it up just enough to insert into your mouth, dip in soy sauce and eat !!

Friday, May 20, 2011

Fruit Crisp, it's almost summer time !!

Fresh Boysenberry Crisp

It's starting to be fresh fruit season and this simple crisp is such a crowd pleaser.
This recipe can easily be doubled and can be used with a wide variety of fruits, fresh or frozen. I love to make this with my fresh raspberries. In the rest of these photos I am using the last of my frozen strawberries and rhubarb.

    * 2 cups of fruit, fresh or  frozen
    * 1/2 cup butter
    * 1/2 teaspoon vanilla extract
    * 1/2 cup packed brown sugar
    * 1/2 cup rolled oats
    * 1 cup unbleached all-purpose flour

Preparation Instructions:

1. Preheat the oven to 350 degrees F

2. Spread the fruit evenly over an 8-inch square glass baking dish or something similar.
Optional: If the fruit is too tart for you, add some sugar to taste. I prefer the fruit without sugar, the tart with the sweet topping is a nice contrast.

3. In separate mixing bowl, melt the butter, then mix in the vanilla extract.

4. Mix in the brown sugar, until smooth, creaming it.
 
5. Mix in the rolled oats.
 
6. Slowly mix in the all-purpose flour, a little at a time. The mixture will start to get crumbly, and that is okay, just keep mixing in the flour as best you can.

 
7. Once it is well blended, crumble the mixture over the fruit in the pan. You want the topping to fall fairly evenly over the fruit, but gaps here and there are perfectly fine.


8. Once the oven is preheated, bake for 25 minutes or until the topping is crispy and slightly browned, and the fruit is bubbling.

9. Serve. May be enjoyed with vanilla ice cream or whipped cream. Or with plain yogurt for breakfast !!

Monday, May 16, 2011

Making stock.

Making your own stock is as simple as boiling water. I have recently discovered this great trick. It is a good way to use the odds and ends of vegetables leftover from other dishes and the bones from your roasted chicken, turkey and seafood.

I use ziplock bags to store ingredients until I have enough material and the time to make the stock.

For veggie stock you can use any vegetable bits, peelings and trimmings from celery, carrots, onions, potatoes, garlic, squash, mushrooms, etc... you get the idea. It's great especially if you can't compost for some reason, you still have a way of using all the old veggie matter.

For seafood stock you can use crab, lobster and shrimp shells and the remains of whole fish.
For poultry stock use the bones and leftover meat from chicken and turkey. I had some turkey meat from Thanksgiving still in my freezer, it was perfect for the stock !!

To my poultry and seafood stock I added onions, carrots, celery and herbs.

Don't forget the herbs in any stock you make, you can use fresh or dried, salt and pepper help bring out the favor too.

Place all your ingredients into your large pot and cover with water, one recipe I read suggested equal parts ingredients to water. Bring to a boil then allow to simmer an hour for vegetable stock and two for the other kinds.

Strain your stock into freezer containers. I like canning jars but use whatever works for you.
If you plan to freeze it in glass jars like I do, leave an inch of headroom and MAKE SURE TO REFRIGERATE IT BEFORE YOU FREEZE IT. I was so sad to loose some great fish stock to a cracked jar. I have learned the hard way to cool it for at least 24 hours before storing it in my freezer. You can also freeze it in ice cube trays if you like to use small amounts.

 I made three different kinds: vegetable, seafood and poultry !! While I made it in large quantities you can make one smaller pot's worth.

It would work well to put it all in your crockpot too !!

You can use your wonderful homemade stock in soups, stews, to cook rice or beans or anything else you can think of.

Wednesday, May 11, 2011

Infused Oils

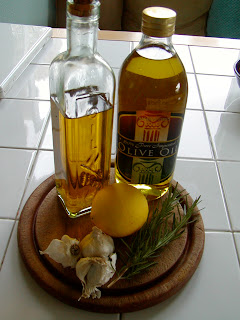
I started making infused oils after tasting some from a farmer's market in Boulder, CO. The lime infused olive oil was amazing! I bought some and used it every chance I could, in salad dressing and straight on steamed or sauteed greens. Once I ran out, I knew I needed to make more. I ended up making several different kinds and giving them as gifts for the holidays. The garlic, lemon, rosemary infused olive oil has become my sister's favorite !!

Here is my thoughts on what grade of olive oil to use...something not too fancy, you will be heating it and infusing it. It seems like a waste of the extra virgin stuff, but use whatever you like.
I use a quart of  olive oil, about 6 or 7 cloves of garlic, coarsely chopped, the peels from one lemon and two small sprigs of rosemary. Use the flat side of a knife to crush the garlic first, this makes it much easier to peel.The easy way to peel the lemon is to use a carrot peeler.

Place everything into a heavy bottom pan and heat slowly on low. The garlic tend to burn easily so watch it and turn it down if it begins to brown too much.

Cook gently for about 10 minutes ( you can cook it longer if you do not have garlic in it), then turn off the heat, cover and let sit for at least several hours, 24 hours is best. Strain and pour into a decorative bottle if you are giving it as a gift. It is probably a good idea to refrigerate it if you are not going to use it within a few months.

You can use a variety of other herbs like oregano, thyme, tarragon, basil, hot peppers,ginger, other citrus like limes, grapefruit, kumquats, etc...

Thursday, May 5, 2011

Carrot Cake Cupcakes

Carrot Cake Cupcakes

Yum, these are so good it's hard to keep them around long enough to frost them.
I got this recipe from Vegan Cupcakes Take Over The World by Isa Chandra Moskowitz and Terry Hope Romero. You can make them vegan or use dairy, I will give you both. I have nothing against dairy in fact I love it. But the title of this little cookbook had me intrigued and I have enjoying some of their other recipes.
This recipe yields a dozen cupcakes.

Ingredients:

2/3 cups sugar
1/3 cup canola oil
1/3 cup yogurt, or soy yogurt or coconut milk
1 teaspoon vanilla
2/3 cup flour
3/4 teaspoon baking soda
1/4 teaspoon baking powder
1/4 teaspoon salt
1/4 teaspoon ground ginger
1/4 teaspoon cinnamon
1 cup grated carrot
1/4 cup chopped walnuts
1/4 raisins or shredded coconut

1) Preheat oven to 350 F. Line muffin tin with 12 cupcake papers. Spray them with non-stick spray.

2) In a medium bowl mix together the sugar, oil, yogurt or coconut milk, and vanilla.
3) Mix together dry ingredients: flour, baking soda, baking powder, salt and the spices. Mix into the liquids until smooth.
4) Fold in the carrots, nuts, raisins (coconut).

5) Fill cupcake papers about 1/2 full.
6) Bake for 26 to 28 minutes, until the toothpick comes out clean.

7) When the cupcakes are completely cooled you can frost them with your favorite buttercream or cream cheese frosting.

In the photo I used a vegan butter cream ( I know it sounds like an oxymoron).

Beat 1 cup Earth Balance until fluffy, add 3 1/2 sifted powdered sugar for about 3 minutes. Add 1 /12 teaspoon vanilla and 1/4 cup soy milk or coconut milk a tablespoon at a time until it reaches the consistency that you want, then beat for 5 to 7 more minutes.This makes a lot of frosting but it will keep for quite a while. You can cut the recipe in half if you like.