Saturday, April 28, 2012

Sundried Tomato Pate in Collard Wraps

Hopefully that title won't send you running the other direction in horror. I know they sound like what we call around here "hippie food". And while they are made with things like raw collard leaves and soaked cashews, they are very tasty and easy to make.

Let's start with the pate. As always I adapted this recipe, it came from a recipe my wonderful friend and yoga teacher made us for dinner a few weeks ago*.

Sundried Tomato Pate.

First off let me just set the record straight, my tomatoes were not "sundried". Where I live two blocks from the ocean, with 60 to 85 % humidity, we can not dry anything in the sun, so mine were dried in my dehydrator. No big deal they taste the same.


Ingredients

1 1/2 cups cashews ( soaked for a couple of hours or overnight.)
3/4 cup dried tomatoes, (soaked in warm water for a couple hours or overnight.)
1/2 cup water from the tomatoes
1/2 cup fresh parsley
3 tablespoons lemon juice
1 tablespoon soy sauce
1 clove garlic
1 teaspoon dried basil
1/2 teaspoon salt
1/4 teaspoon fresh ground pepper
2 tablespoons olive oil (or flax oil)

a bunch of collard leaves
1-2 avocados
a handful of arugula, other small greens or sprouts

* The version my friend made used almonds and fresh basil ( I chose fresh parsley since basil is not quite in season yet.)


1) Soak the nuts and tomatoes in separate  bowls for a few hours or overnight.
 Save the water from the tomatoes.
2) In the food processor, whiz the garlic clove first then add the nuts.
Blend until the nuts are creamy.

3) Add the parsley, lemon juice, tomatoes, tomato water, soy sauce, dried basil, salt, pepper and olive oil. Blend well. Taste and adjust seasoning as needed.

4) Wash and stem the collard leaves by cutting them along the center vein.
5) At one end of half a leaf spread 1-2 tablespoons of the pate. Add a slice of avocado, and a piece of arugula. Carefully roll it up.

6) Place seam side down on a plate and serve !! They will last several days in the fridge and travel well for potlucks. You can use other leaves as well, lettuce or cabbage.
The pate itself would be great in sandwiches or as a dip with homemade crackers.


Monday, April 23, 2012

Laurie’s Light Lemon Curd

Lemon curd is very tasty on the millet muffins !!
I love alliterations as you can tell.
I love my version of lemon curd as well.
Uh oh, that was starting to sound like a corny rhyme.
Quick, cut to the chase.
Lemon curd is a thick, rich topping that is classically used on scones and makes a wonderful addition to tarts, cheesecake, yogurt or a spoon.
Since lemon curd is made of butter, sugar and egg yolks, "light" is a relative term.
Traditional recipes call for lots of egg yolks which is why I like my "light" version better.
Look at the beautiful color of these yolks. We love the fresh eggs from our four hens !!


Laurie's Light Lemon Curd

Ingredients
2/3 cup sugar
1/4 cup lemon juice
grated zest of one lemon
2 tbsp. water
3 egg yolks
1/2 cup butter


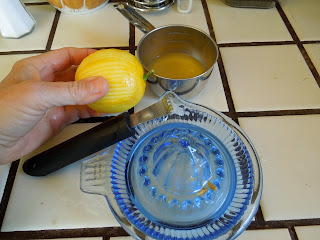
1) Begin by zesting your lemon and then juicing it to make 1/4 cup of juice.
2) Mix the juice and zest in a small saucepan with 2/3 cups sugar and 2 tablespoons water.
3) Whisk in three eggs yolks.
 4) Cut the 1/2 cup of butter into pieces.
5) Add to the saucepan and set over low heat.
6) Stir constantly but gently with a wooden spoon.
7) Bring the mixture to a simmer and cook for about 1 minute until the sauce thickens slightly.

8) Strain through a fine sieve into a glass bowl or jar.

It can be served warm over ice cream or on scones or allowed to chill and used in fruit tarts or on cheesecake.

It must be store in the fridge and will last for up to a week. It freezes beautifully.
This recipes makes about 1 cup of curd.

Thursday, April 19, 2012

I love my bread machine

With the popularity of the no-knead bread, my bread machine has languished for almost a year, only coming out of the pantry (the garage) for special appearances when I need dough for pizza, focaccia or rolls. Lately I have gotten tried of the the no-knead bread...

But let's back up a minute, I remember 10 or 15 years ago when my wonderful sister-in-law first got her bread machine from Costco. She sang it's praise and when I tasted her homemade bread I was delighted. For Bob's birthday, I bought  him one !!
It's an Oster and I can count on my fingers the number of times I have actually bought sliced bread since this magical machine came into our lives !! Along with the machine my SIL also recommended a fabulous recipe book to go with it.
I am on my second or third copy as it keeps falling apart for all the use it gets. I have tried many of the recipes and they are so tasty and varied, something for everyone. I have bought copies of this book to give to family and friends once they buy a bread machine, it's that good.

Recently I have returned to my dear bread machine, not the original but the same make and model. (For some reason we have found them easy to pick up at yard sales...)
I have discovered a recipe I had not tried before and now it is our favorite bread for toast or snacks with homemade nut butter and jam.

Marilyn's Everyday Health Bread

This recipe is for a 1 1/2 pound loaf which what my machine makes.

Best to add the ingredients in this order:

1 1/4 cup water
1 1/2 cup whole wheat flour
1 1/2 cup bread flour
1/2 cup rolled oats ( I use the multi-grain version from Trader Joe's, do not use instant oatmeal.)

1 1/2 teaspoons salt
1 1/2 tablespoons butter
3 tablespoons brown sugar
1 1/2 tablespoons nonfat dry milk powder
2 teaspoons active dry yeast *


Select Light Crust setting and press start.
I do check it after the first 10 minutes or so be sure the dough looks right.
This is perfect dough, if it seems too dry add a teaspoon more water, too wet a tablespoon more flour.
In 3 hours when the cycle is complete remove loaf to a rack and allow to cool for an hour before slicing.

The perfect loaf !! It does really work better if you wait that hour before slicing into it. I know the smell is killing you but be patient !!

* about yeast...even though the Bread Machine Magic books tell you NOT to use instant rise yeast in their recipes, it has worked just fine for me. I used it because it was what I had on hand. I made sure to use a scant 2 teaspoons in this recipe.
Another trick is to buy your yeast at places like Costco or online.They sell it in one pound vacuum sealed blocks. It is much cheaper this way. Once I open it, I pour it into a glass container with a good lid and store it in my fridge. You can share a pound with a friend if you don't go through it very quickly, although my yeast lasts in the fridge for 6 months.

Friday, April 13, 2012

Necessity is the Mother of Invention...

Or is that the name of Frank Zappa's old band :-)
Do you remember...Brown Shoes Don't Make it or Suzy Cream Cheese or Ruben and The Jets??
I was first introduced to the Mothers of Invention by a classically goofy science teacher in 8th grade. Why this crazy man was teaching science at a Catholic girls school in Paris, France, I will never understand. Bless his heart, he got me excited about science and Frank Zappa.

But I digress...the other day I went to get out my mini food processor to grind seeds for those great crackers. I dropped the lid on the floor and was bummed to see that I had broken off the little plastic piece that triggers the machine to work.

At first I thought all was lost , then I came up with this quick and goofy fix.
I used a knife to trigger the machine to work by pressing it right where that little plastic piece normally would go.
It worked well, not a permanent fix but good for now. I hope to find another machine at a yard sale soon.

Monday, April 2, 2012

Korean barbeque inspired beef

It makes me hungry just thinking about this dish, good thing I am having the leftovers for dinner tonight, along with some fresh asparagus. We don't eat beef very often but from now on this is how I will prepare it !!

When we moved Genna down to LA in January, her new roommates took us to this small Korean barbeque place Tofu-Ya. I loved the beef dish I had and recently was wishing we had a good Korean restaurant  around here.

I remembered a conversation I had with my Niece Knitty about getting beef finely sliced at her Japanese market. I knew just the place to go : El Salchichero, our local butcher. I explained what I wanted to make, the guy behind the counter suggested a baseball cut top sirloin. I asked him to slice it very thinly, which he did.

I set rice to cook in the rice cooker and began to caramelized an sliced onion in some olive oil and butter. Once the onion and rice were started, I made a marinade for the beef. I apologize for the lack of photos, I had no idea this dish would turn out soooo good.

Beef marinade:
1/2 cup soy sauce
2 Tbsp. homemade brown sugar

Stir together to dissolve the sugar, then pour it over the beef in a bowl and mix.
I had a little over half a pound of sliced beef.

Once the onions were done I removed them to a bowl and began to saute the mushrooms.
When they were done I removed them, added a bit of olive oil and began to carefully cook the slices of beef, it took only than a minute to brown the meat on both sides. With the meat all cooked, everything when back into the pan to cook together for maybe 5 minutes.

I served it over rice with a beet and goat cheese salad.
I was amazed how good it tasted. I kept trying to think of what kind of seasonings I would add next time but this dish was practically perfect the way it was. If you wanted more heat, you could add a teaspoon of red chili flakes to the marinade or some hot sauce.

That half pound of beef made for four meals. Due to the fact that it is local and grass fed, it's omega 3 fatty acids are high.